What Is A Vape Tank?
Whether you're new to vaping or a seasoned enthusiast, understanding vape tanks can enhance your vaping journey. A vape tank is a crucial component of a vaping device, acting as the reservoir that holds e-liquid and the heating element that vapourizes it. It’s responsible for containing the e-liquid, housing the coil, and providing airflow paths which work together to deliver vapour when you inhale. Vape tanks come in various designs and materials, catering to differing preferences and styles of vaping, such as Direct-to-Lung (DTL) and Mouth-to-Lung (MTL) experiences.
What Parts Make Up A Vape Tank?
Understanding the set-up of a vape tank can help you maintain, clean, and choose the right tank for your needs. Here are the primary parts:
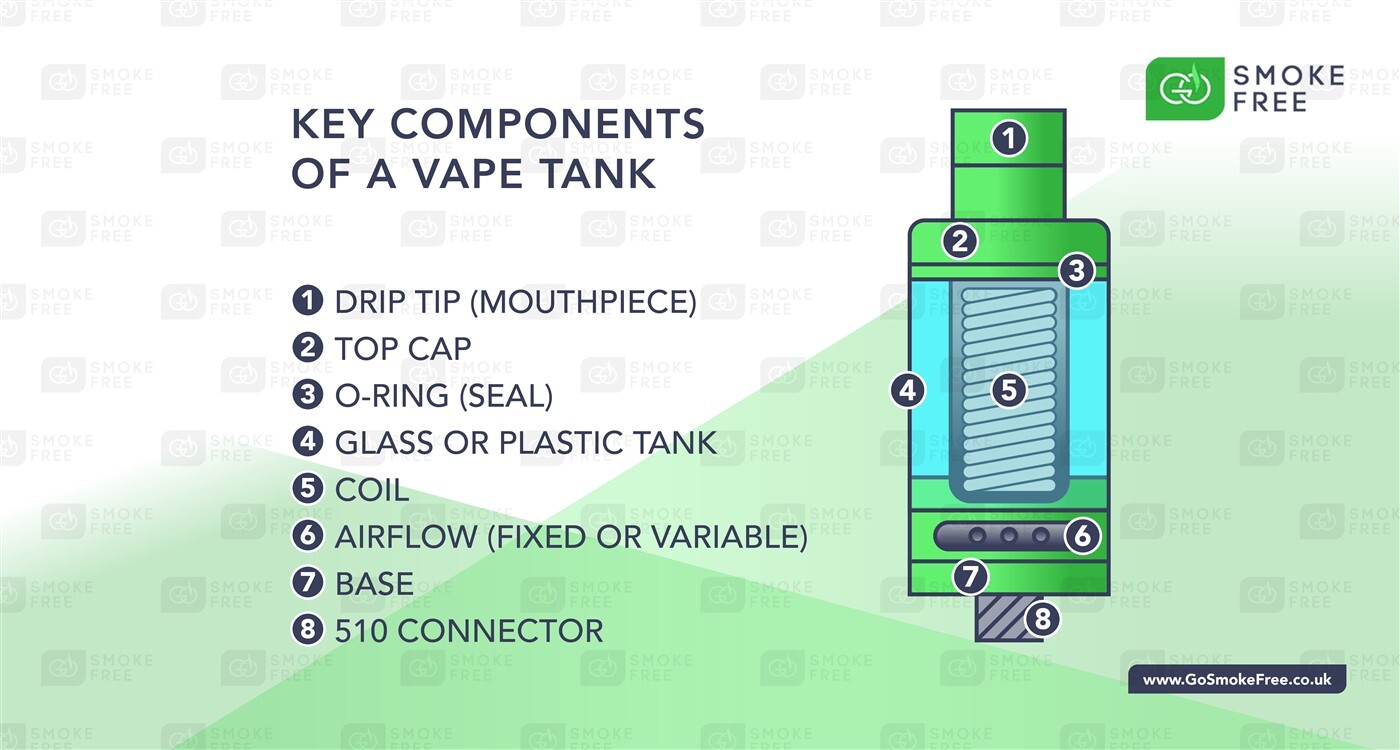
1. Drip Tip: The mouthpiece through which you inhale vapour. It can be made from various materials like plastic, metal, or resin, and come in different shapes and sizes.
2. Top Cap: Seals the tank and often features a fill port for e-liquid.
3. O-Ring (Seals): Essentially rubber rings to stop leaking of liquid from between tank glass/plastic and top cap.
4. Glass / Plastic Tank: The transparent cylinder that holds the e-liquid. Glass is commonly used, but you'll also find options in reinforced plastic.
5. Coil: The heating element and wick assembly that vapourizes the e-liquid. Coils are replaceable and come in different resistances.
6. Airflow: most tanks have ability to vary airflow into tank resulting in tighter or looser draw.
7. Base: The bottom part of the tank that screws onto the vaping device. It usually houses the airflow control ring (AFC).
8. 510 Connector: industry standard connector connecting tank and the vape mod providing power to the tank
What Are The Different Types Of Vape Tanks?
The variety of vape tanks allows vapers to customize their experience to their preferences. Here's a breakdown of the main types:
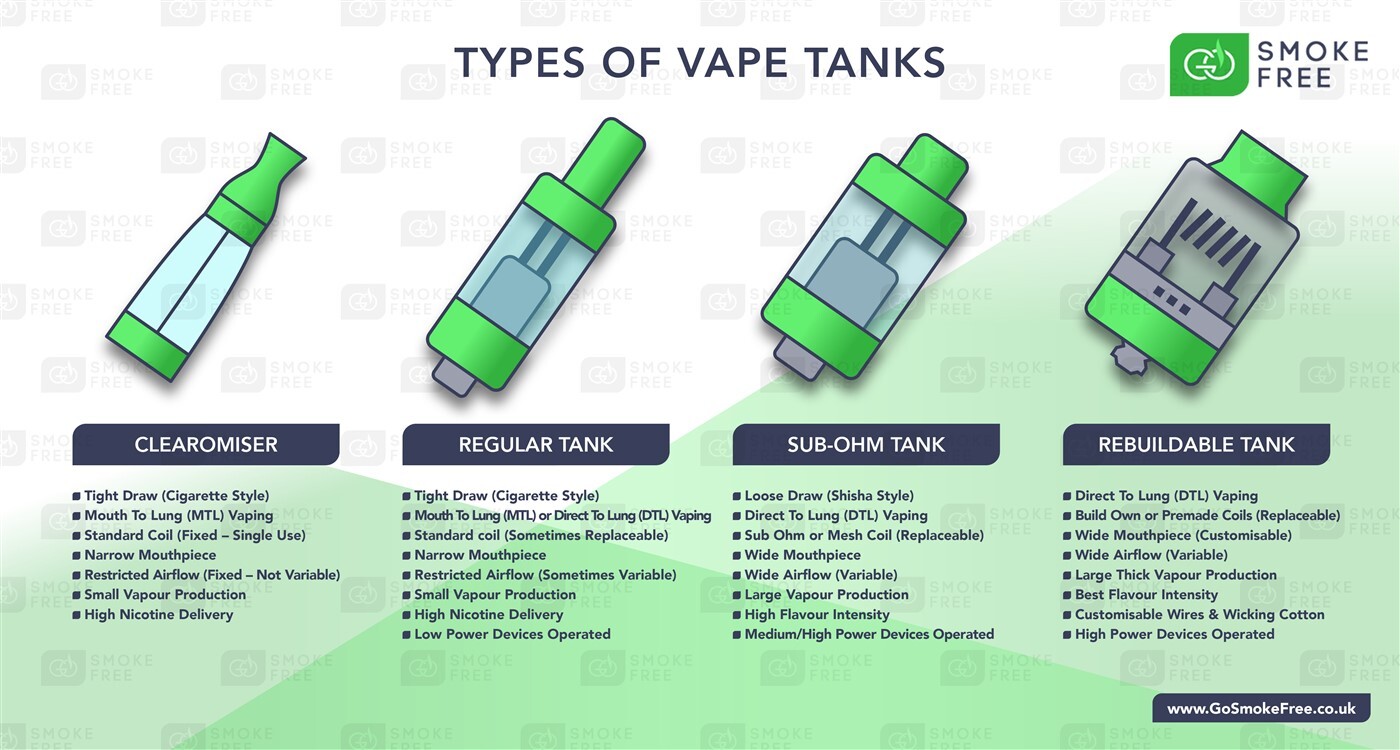
Clearomizers
Clearomizers are basic, easy-to-use tanks ideal for beginners. They are typically filled from the top and feature replaceable coil heads. Clearomizers offer a straightforward vaping experience and are great for those who prefer a lower-power, MTL style of vaping.
Sub-Ohm Tanks
Perfect for DTL vaping, sub-ohm tanks use coils with a resistance less than 1 ohm. They produce large clouds of vapour and intense flavour. These tanks usually require higher power settings and utilize e-liquids with a higher VG ratio.
RTA (Rebuildable Tank Atomizer)
RTAs offer an advanced vaping experience by allowing users to build their own coils. They provide a blend of the convenience of a tank with the customizability of an RDA (Rebuildable Dripping Atomizer). RTAs are favored by experienced vapers who enjoy tweaking their builds for optimal performance.
RDTA (Rebuildable Dripping Tank Atomizer)
RDTAs combine features of RTA and RDA, offering the convenience of a tank with the performance of a dripper. These tanks allow for building custom coils and are known for delivering excellent flavour and vapour production.
MTL Tanks
Designed for those who prefer a tighter draw similar to smoking cigarettes, MTL tanks provide a more restricted airflow and use higher-resistance coils. They work best with higher PG e-liquids and are ideal for nicotine salts.
Which Tank Fits My Vape?
Compatibility is crucial when choosing a vape tank. Consider the following:
1. Connection Type: Most tanks use a standard 510 threading to attach to the mod. Ensure your device is compatible with the 510 connector.
2. Wattage Range: Match the tank's coil ratings with your device’s wattage range. Using a tank with coils outside your device's capabilities can result in suboptimal performance.
3. Size and Fit: Ensure the diameter of the tank fits your mod. Larger tanks may overhang on smaller devices, and smaller tanks may not utilize the device's full potential.
4. Airflow Compatibility: Some tanks are designed specifically for high-wattage devices with wide airflow paths, while others are built for low-wattage MTL mods.
How Do I Choose A Vape Tank?

Selecting the right vape tank depends on your vaping style, preferences, and experience level:
1. Vaping Style: Determine if you prefer DTL or MTL vaping. Sub-ohm tanks and RDTAs are ideal for DTL, while clearomizers and MTL tanks cater to MTL preferences.
2. E-Liquid Preferences: If you enjoy high-VG juices, opt for sub-ohm tanks or RDTAs. For higher nicotine levels or nicotine salts, MTL tanks and clearomizers are ideal.
3. Ease of Use: Beginners might prefer clearomizers or sub-ohm tanks with pre-built coils. Advanced users who enjoy custom builds may lean towards RTAs or RDTAs.
4. Portability: Portable, compact tanks are essential for on-the-go vaping. Larger tanks offer more capacity but might be less convenient to carry.
5. Budget: Prices vary based on the complexity and materials used. Determine your budget and find a tank that fits without compromising on quality.
How to Store Vape Tanks

Proper storage of vape tanks helps maintain their condition and efficiency. Here are some tips:
1. Clean and Dry: Before storing, clean the tank thoroughly to remove e-liquid residue and let it dry completely to prevent mold and mildew.
2. Separate Components: Disassemble the tank into its components (drip tip, top cap, glass tube, etc.) and store them separately in a secure container to avoid breakage.
3. Avoid Extreme Temperatures: Store tanks in a cool, dry place away from direct sunlight or extreme temperatures to prevent deterioration of parts.
4. Keep Away from Dust: Use a carrying case or box to protect the tank from dust and debris, which can affect its performance.
How Do You Clean Vape Tanks?

Cleaning your vape tank regularly ensures optimal performance and flavour. Here’s a step-by-step guide:
1. Disassemble the Tank: Take the tank apart, removing the drip tip, glass tube, coil, and base.
2. Rinse with Warm Water: Rinse each component (except the coil) under warm water to remove e-liquid residue.
3. Soak Components: Soak the parts in a mixture of warm water and mild soap for around 15 minutes to dissolve remaining residue.
4. Rinse Thoroughly: Rinse the components under warm running water to remove any soap.
5. Dry Completely: Place the parts on a paper towel and let them air dry completely. Using a hairdryer on a cool setting can speed up the process.
6. Inspect and Reassemble: Once dry, inspect each part for cleanliness and reassemble the tank.
Choosing the Right E-Liquid For Your Tank
The type of e-liquid you choose can significantly impact your vaping experience:
PG/VG Ratio
High-PG e-liquids provide a stronger throat hit and are suitable for MTL tanks. Thicker high-VG liquids produce more vapour and are best for sub-ohm and DTL tanks.
Nicotine Strength
Choose the nicotine level that suits your preference. Higher nicotine is typically used in MTL tanks, while sub-ohm tanks can handle lower nicotine levels to avoid harsh throat hits.
Flavour Profiles
Your tank can influence how flavours are perceived. Sub-ohm tanks often enhance fruity and dessert flavours, while MTL tanks may bring out the nuances in tobacco or menthol flavours.
Coil Priming to Enhance Performance
Priming your coil is essential to prevent dry hits and ensure longevity:
1. Saturate the Coil: Apply a few drops of e-liquid directly onto the cotton inside the coil and let it soak for a few minutes.
2. Assemble the Tank: Fill the tank with e-liquid and reassemble it.
3. Wait Before Vaping: Allow the coil to sit in the filled tank for about 5-10 minutes to ensure the cotton is fully saturated.
4. Start at Low Wattage: Begin vaping at a lower wattage than recommended and gradually increase to your preferred setting. This step protects the coil from burning during initial use.
How to Adjust Vape Settings

Fine-tuning your device settings can optimize your vaping experience:
1. Wattage: Adjust the wattage to match the coil’s recommended range. Higher wattage produces more vapour but can consume more e-liquid and battery.
2. Airflow: Customize the airflow settings to suit your preference. Open airflow delivers larger clouds, while tighter airflow enhances flavour and offers a more restricted draw.
3. Temperature Control: If your device supports temperature control, set the temperature according to the coil material (e.g., stainless steel, titanium, nickel) for consistent performance.
4. E-Liquid Viscosity: High-VG e-liquids require higher wattages for proper vapourization, while higher-PG liquids perform well at lower wattages.
By understanding and optimizing these settings, you can fine-tune your vaping device to deliver a satisfying, customized experience.
Vape Tanks at Go Smoke Free
Vape tanks are more than just e-liquid reservoirs; they are integral to creating the perfect vaping experience. From selecting the right type of tank and understanding its components to maintaining and optimizing its performance, there are several factors to consider for achieving vaping satisfaction.
At Go Smoke Free, we believe that an informed vaper is a satisfied vaper. We hope this guide has provided you with the knowledge and confidence to choose and maintain the perfect vape tank for your needs, ensuring a smooth and enjoyable vaping journey. Don’t forget, we stock everything you need to keep your vape working at its best. From a wide selection of vape batteries, to coils, vape chargers, tanks and more. With great deals on bulk buys, and fast delivery on your order, there’s no better time to stock up on the essentials. Happy vaping!
